Sunday 30 April 2017

Handmade Monday #23

Welcome to Handmade Monday,
our weekly craft link up.
Hi and welcome to another Handmade Monday, the place to share your makes, bakes and other handmade craft ideas or just find some new inspiration.

It's a bank holiday weekend here in the UK so I'm taking a weekend off, scheduling this (fingers crossed it's all ok) and visiting your links later in the week.
Don't forget, I have a pair of these beautiful embroidery scissors to give away to anyone with a UK address, there's still time to enter, details here.
I have a 10% discount code for anyone not in the UK too. They really are great, super sharp little scissors - I'm not just saying that. The only reason I'm giving them away is because I already have a pair of stork embroidery scissors that I've had for years. My mum gave them to me when I was a teenager so I am pretty sentimental about them. I don't NEED 2 pairs and I'd rather someone else made good use of these new ones.

Here are the features from last weeks Handmade Monday:
I might have mentioned before that I hate throwing things away, especially if I might be able to use them one day so I love this pretty clutch bag made from fabric scraps by Vicky Myers Creations.


I love discovering new crochet stitches and I'd not seen this Solomon's knot stitch before. Anna from Tea and a Sewing Machine shows us how. It looks great in this chunky wool from Wool and the Gang (made from waste wool from the yarn making process - how cool is that?) but I imagine it would look equally good with something finer. 

Congratulations, here is a "Yay! I was featured" button for your blog.


Instructions: Select all code above, copy it and paste it inside your blog post as HTML

We are all about sharing and caring here at Handmade Monday so if you do link up please take some time to visit some other links and leave a comment. Plus it would be great if you could share a few on the social media of your choice. (I know the world of tweets, likes, shares and hashtags is not for everyone so whatever you can do is fine!)
Every entry to Handmade Monday gets pinned onto our Handmade Monday pinterest board . It's a group board so if you'd like to join and pin your own Handmade Monday entries (save me doing them all!) then just make sure you follow me on pinterest and send me a message including the email you use for pinterest and I'll invite you.

The rules for Handmade Monday are simple:
  • Did you make it? Yes - hooray, we'd love to see it!
  • Add the link to a specific blog post, not your main site URL.
  • Link up to 3 posts each week.
  • Mingle - visit some of the other links - comment - sharelet's support one another and grow our craft community.
If you're not sure on anything, more information can be found here.


read more

Wednesday 26 April 2017

Embroidered Sampler Bag

Give an inexpensive pre made bag a pretty traditional sampler effect.
Embroidered Sampler Effect Drawstring Bag
Way back in February I visited the CHSI stitches show at the NEC near Birmingham and had a fab time seeing lots of lovely new trends and products in the craft world. One of my favourite bits of the day was the bloggers brunch where I got to meet some of my blogging friends in real life, made some new blogging friends and had a lovely workshop and goody bag from DMC. 
At the show, whilst we chatted, we all started a little embroidery on the pre made drawstring bags using some printed Magic Sheet and Coloris thread from DMC. Most people cut out letters to make a phrase or name but I stuck the whole alphabet to my bag with the idea to make a sampler style embroidery. I did share the beginnings of this project on Instagram at the time.
using DMC magic sheet
You just peel the backing from the Magic sheet and press it firmly to your fabric and start stitching. I used a simple backstitch with 2 strands of the Coloris thread. I dotted the i & j with french knots. Once the alphabet was completed I just rinsed it under the tap and the magic sheet turned to jelly then vanished.
using DMC magic sheet
Once it dried I used a washable pen to draw a wavy border.
embroidered back stitch alphabet
I worked the embroidery on the border in the same way as the alphabet, 2 strands of Coloris thread with backstitch and lazy daisy stitches for the flowers and leaves.
Embroidered Sampler Effect Drawstring Bag
The blue washable pen just washes out as easily as the magic sheet did. After a good ironing I was happy with the look but I was a bit disappointed that the darker pieces of the thread showed through where I had dragged them across the back between letters. It doesn't really show in the photos but in real life it was enough to annoy me! 
back stitch alphabet
This is what slowed me down and made this take 2 months to finish. after leaving it on one side for a while the solution was a quick simple lining. 
I used a little bit of floral fabric from my stash. I just made a bag the same size as the drawstring bag, then wrong side out, popped it inside the embroidered bag. Then I turned the top edge under and top stitched round just under the drawstring casing.
Embroidered Sampler Effect Drawstring Bag
I am happy now! A lovely new project bag to keep my next little make all together.
Embroidered Sampler Effect Drawstring Bag

read more

Tuesday 25 April 2017

Warm Crochet Embroidery Scissors Giveaway

Are these the prettiest embroidery scissors you've ever seen?
Warm Crochet sent me some of their pretty embroidery scissors to test and I have a pair to give away and a discount code for you. 
I was working on a few embroidery projects last week so it was a great time to test these scissors out.
They are cute, comfy and very sharp. In essence everything I would look for in embroidery scissors. 
I have a pair of these sweet little scissors to give away. It's a UK only giveway I'm afraid but Warm Crochet do ship internationally and are offering a discount for you. Use " SUMOFTHEIRSTORIES " at the Warm Crochet checkout for 10% off the normal price.

If you have a UK address then you are welcome to enter the giveaway raffle below. 
a Rafflecopter giveaway

read more

Sunday 23 April 2017

Handmade Monday #22

Welcome to the 22nd week of Handmade Monday here at Sum of their Stories.
I'm so pleased that you have stopped by for another Handmade Monday, the place to share your makes, bakes and other handmade craft ideas or just find some new inspiration.

I've been enjoying a little embroidery this week, and made this little purse from the kit that came with Mollie Makes Magazine. I also finally finished the alphabet embroidery I started back in February, more on that another day. I've been testing out these gorgeous little scissors from Warm Crochet.
I'll have a pair of these embroidery scissors to give away later in the week. It'll be a UK only prize draw I'm afraid, so if you are UK based or know someone who is, pop my later in the week to enter. Good news though, I will have a discount code to share for everyone else.

Here are the features from last weeks Handmade Monday:
Pam from Threading My Way took things back to sewing basics with this great tutorial to make a simple gathered skirt. I especially love this because a gathered skirt like this was the first thing I ever made for myself when I was little that I could actually wear. 

Keeping with the 'back to basics' theme, Jenny from Jennysis Crafts shared a papercrafting video tutorial on the beautiful effects you can get with heat embossing.

Congratulations, here is a "Yay! I was featured" button for your blog.


Instructions: Select all code above, copy it and paste it inside your blog post as HTML

We are all about sharing and caring here at Handmade Monday so if you do link up please take some time to visit some other links and leave a comment. Plus it would be great if you could share a few on the social media of your choice. (I know the world of tweets, likes, shares and hashtags is not for everyone so whatever you can do is fine!)
We have a Handmade Monday Facebook Group where we share tips and ideas. Anyone who links up here regularly you are welcome to join us, just send a request. Every entry to Handmade Monday gets pinned onto our Handmade Monday pinterest board too.

The rules for Handmade Monday are simple:
  • Did you make it? Yes - hooray, we'd love to see it!
  • Add the link to a specific blog post, not your main site URL.
  • Link up to 3 posts each week.
  • Mingle - visit some of the other links - comment - sharelet's support one another and grow our craft community.
If you're not sure on anything, more information can be found here.


read more

Wednesday 19 April 2017

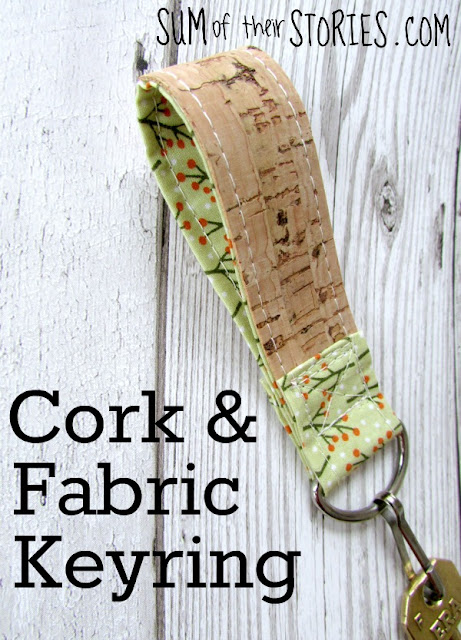
Cork & Fabric Keyring

A simple little keyring made with scraps of cork and fabric.
Cork and fabric Keyring
Yesterday I shared this cork passport holder I was able to make using the contents of the Craftiosity Craft Kit box I was sent. 
Cork and fabric Keyring and passport holder
As I mentioned, and you can see in the photo, I had a little bit of the cork fabric left, enough to make a little key ring.
Cork and fabric Keyring
To make your own cork key ring you will need:
A scrap of cork fabric 16cm(6") x 2.5cm(1")
A piece of fabric 28cm(11") x 5.5cm(2.25")
A D ring and clip - mine was in my stash saved from an old lanyard

Press a hem on each long side of the fabric and press with an iron. You want the fabric strip to measure 2.5cm - the same as the cork. As you can see in the photo I did one narrow hem and one wider one. I'm not sure why. You could make them even if you like! Press a small hem on one short end too.
Cork and fabric Keyring
Place the cork strip onto the end of fabric strip, wrong sides together, holding with clips. Top stitch down one side, along the short end hem and back up with other side. Cork and fabric Keyring
Bring the fabric end up to just overlap the end of the cork and clip to hold in place.
Cork and fabric Keyring
Fold the cork end over so the cork is facing out forming a loop and the 2 cork ends are level. Slip the D ring onto the fabric end then loop the fabric back to cover the uncovered end of the cork. Wow this is difficult to put into words! Just look at the photos, I think that is much easier to work out!
Cork and fabric Keyring
Now stitch a square to hold all this in place. This is asking a lot of your sewing machine so go slow and use the handle to turn the needle really slowly if you need to. You are aiming for something like this.
Cork and fabric Keyring
Trim off any loose threads and you are done.
Cork and fabric Keyring
I love finding ways to use up little leftover scraps.

read more

Tuesday 18 April 2017

A Craftiosity Craft Kit Review, a Cork Passport Holder

A review of April's Craftiosity craft kit subscription box to make a cork passport holder.
I was given one of the Craftiosity April craft kit boxes in return for an honest review. 
I love the idea of subscription boxes, a present that drops through the letter box regularly with surprise goodies - what's not to like. The box from Craftiosity arrived last week and I saved it for the bank holiday weekend so I could enjoy playing with it's contents.
First thing to say is how beautifully the box was packaged. I know it should be what's on the inside that counts but pretty packaging makes it all feel like a real treat.
Craftiosity Craft Kit Box
This April box contains everything needed to make a cork passport holder, not just materials either, a couple of tools are in there too.
My Craftiosity box contained:
Cork Fabric
Bright Blue Felt
Bondaweb
Linen Thread
An Awl
An Overstitch wheel
Needle & Thimble
Fabric Clips
A Template
Full Instructions

As well as the printed instructions in the box, Craftiosity also have a blog where they publish a video tutorial for the projects in case you need extra help with any of the instructions.

I did wander slightly from the instructions in the kit, I just can't help myself - sorry not sorry! The lovely folks at Craftiosity do say "make it your own way" and give some ideas for personalisation so I feel it is not only allowed but encouraged!
I used a water soluble pen to draw a paper aeroplane on the front piece of my passport holder before I attached the felt so back was hidden by the felt later.
Paper aeroplane design for embroidery
The kit had more than enough of the linen thread to add this extra embroidery.
Cork fabric passport cover
I also switched the stitching round the edge from a backstitch to a simple running stitch. I found the thread was pretty tough to pull through the holes I'd made in the cork even though I'd used the awl to make them, and with the thimble to protect my poor fingers! 
Inside, I did the first lines of decorative stitching as backstitch as per the instructions but going through the holes that second time was tricky.
Cork fabric passport cover
The finished passport holder is sturdy enough with just a running stitch so I'm happy. My passport fits in perfectly too!
Cork fabric passport cover
I love the look and feel of this cork fabric, I've seen a few ideas of things other people have made with it but I'm not sure it is something I would have gone out and bought just to experiment with. And THAT is the beauty of a kit like this, everything you need to try something new is included.
To be completely honest I'm not sure I would treat myself to a box subscription like this, but only because I have a ridiculously large stash of craft materials as it is. I think they make the most brilliant gifts though, especially if you know someone who is new to crafting and who doesn't have a lot of equipment or a big stash of materials.
The Craftiosity boxes are £20 each if you buy them individually, or at a discount if you buy more or subscribe - all the details of the different options are on the Craftiosity website here.

I had a little bit of the cork fabric left over so I was able to make a keyring too.
Cork fabric passport cover
I'll share the tutorial for that tomorrow. The tutorial is here if you fancy a peek. 

read more

Sunday 16 April 2017

Handmade Monday #21

Welcome to Handmade Monday.
I'm so pleased that you have stopped by for another Handmade Monday, the place to share your makes, bakes and other handmade craft ideas or just find some new inspiration.

Happy Easter to everyone celebrating.


Here are the features from last weeks Handmade Monday:
I love these pretty paper spring flowers from Suzer Space, they look really simple to make too.

Liz from Howling at the Moon has crocheted these lovely lanterns for the garden, she has a link to a free pattern too. 
Congratulations, here is a "Yay! I was featured" button for your blog.


Instructions: Select all code above, copy it and paste it inside your blog post as HTML

We are all about sharing and caring here at Handmade Monday so if you do link up please take some time to visit some other links and share a few on the social media of your choice. If you are not a social media fan then comments are lovely too (I know the world of tweets, likes, shares and hashtags is not for everyone!)
We have a Handmade Monday Facebook Group where we share tips and ideas. If you like to link up here regularly you are welcome to join us, just send a request. Every entry to Handmade Monday gets pinned onto our Handmade Monday pinterest board too.

The rules for Handmade Monday are simple:
  • Did you make it? Yes - hooray, we'd love to see it!
  • Add the link to a specific blog post, not your main site URL.
  • Link up to 3 posts each week.
  • Mingle - visit some of the other links - comment - sharelet's support one another and grow our craft community.
If you're not sure on anything, more information can be found here.


read more